Securing your AKS cluster with a Linux Firewall VM
How to configure the firewall VM, the virtual network, and the network security group to route traffic to your AKS endpoints.
Posted on: Feb 2, 2024

Securing your AKS cluster with a Linux Firewall VM
A network virtual appliance (NVA) is a virtual machine that performs network functions such as firewalling. In this post, I will walk you through how to use a Linux VM as an NVA in Azure and route traffic to an endpoint running on Azure Kubernetes Service (AKS). I will cover two scenarios: one where the traffic goes through an internal load balancer, and another where the traffic goes directly to a pod.
This assumes you already have a Linux VM and an AKS Cluster created - both in their own VNET. The cluster and the Linux VM need to be VNET peered already. Here is a quick start on VNET peering if you need a refresher.
For this example we will be using Ubuntu 22.04. Since we have a few excellent tutorials on how to create a Linux VM on Azure I will not be describing that process here. If you need an example, here’s a good one that describe the creation process using the Azure CLI.
After your VM is created, ssh into it and allow IP forwarding:
sysctl -w net.ipv4.ip_forward=1
For that change to be persistent, make sure you add it to /etc/sysctl.conf. Moving on, let’s look into our first scenario.
Scenario 1: NVA routing to a pod through an internal load balancer
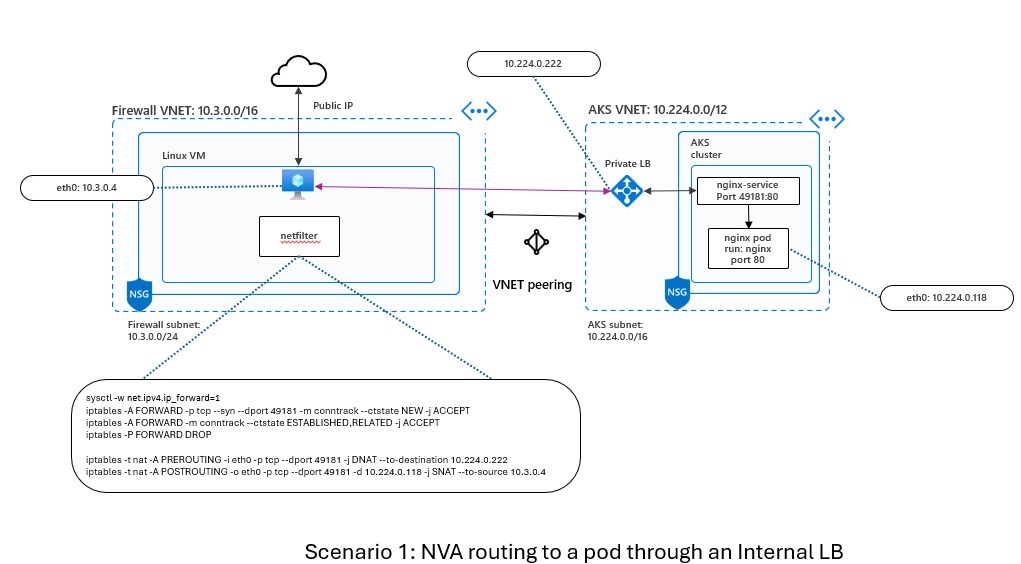
In this scenario, we will route traffic from the Linux VM to a pod in the AKS cluster through an internal load balancer. The internal load balancer will balance the traffic among the pods that match a certain label selector. The diagram below shows the network topology for this scenario:
To implement this scenario, we will need to do the following steps:
- Create a sample workload on the AKS cluster
- Create an internal load balancer on the AKS cluster
- Set up the firewall rules on the Linux VM
Create a sample workload
First, we will create a sample workload on the AKS cluster to test our traffic routing. We will use a simple Python web server that listens on port 80 and returns a hello message. We will deploy a pod that runs this web server and label it with run: tmp-shell. To do this, run the following commands:
# Connect to the AKS cluster
az aks get-credentials --resource-group <your-resource-group> --name <your-aks-cluster>

# Deploy a pod for testing
kubectl run tmp-shell --image nicolaka/netshoot --labels run=tmp-shell

# Run a simple Python web server on port 80
kubectl exec -it tmp-shell -- python3 -m http.server 80
You should see something like this:
Serving HTTP on 0.0.0.0 port 80 (http://0.0.0.0:80/) ...
Create an internal load balancer
Next, we will create an internal load balancer on the AKS cluster that will expose the pod on port 49180. The internal load balancer will use the label selector run: tmp-shell to find the pod and balance the traffic among the pods that match this selector. To do this, run the following commands:
# Create a service of type LoadBalancer with an annotation to make it internal
cat <<EOF | kubectl apply -f -
apiVersion: v1
kind: Service
metadata:
  name: tmp-shell
  annotations:
    service.beta.kubernetes.io/azure-load-balancer-internal: "true"
spec:
  type: LoadBalancer
  ports:
  - port: 49180
  selector:
    run: tmp-shell
EOF
This will create a service named tmp-shell of type LoadBalancer with an annotation to make it internal. The service will expose port 49180 and forward the traffic to port 80 of the pod that matches the label selector run: tmp-shell.
To verify that the service is created and has an internal IP address, run the following command:
kubectl get service tmp-shell
You should see something like this:
NAME         TYPE           CLUSTER-IP     EXTERNAL-IP    PORT(S)           AGE
kubernetes   ClusterIP      10.0.0.1       <none>         443/TCP           2d1h
tmp-shell    LoadBalancer   10.0.166.113   10.224.0.222   49180:30265/TCP   47h
This means that the service has an internal IP address of 10.224.0.222 and is listening on port 49180.
Setup the firewall
Finally, we will set up the firewall rules on the Linux VM to route the traffic from the VM to the internal load balancer. We will use iptables to configure the firewall rules. To do this, run the following commands on the Linux VM:
iptables -A FORWARD -p tcp --syn --dport 49181 -m conntrack --ctstate NEW -j ACCEPT
iptables -A FORWARD -m conntrack --ctstate ESTABLISHED,RELATED -j ACCEPT
iptables -P FORWARD DROP
iptables -t nat -A PREROUTING -i eth0 -p tcp --dport 49181 -j DNAT --to-destination 10.224.0.222
iptables -t nat -A POSTROUTING -o eth0 -p tcp --dport 49181 -d 10.224.0.222 -j SNAT --to-source 10.3.0.4
Explanation:
| Rule | Notes |
|---|---|
| iptables -A PREROUTING -i eth0 -p tcp -m tcp –dport 49181 -j DNAT –to-destination 10.224.0.222 | Packet arrived on eth0 (coming from the public IP of the VM) and get’s DNAT’ed to the Internal Load Balancer private IP and to the service in AKS that will send traffic to the pod on port 80. |
| iptables -A FORWARD -p tcp -m tcp –dport 49181 -m conntrack –ctstate NEW -j ACCEPT | Allow forwarding on port 49181. |
| iptables -A FORWARD -m conntrack –ctstate ESTABLISHED,RELATED -j ACCEPT | Match any packet that is related to an existing connection, using the conntrack module. This is necessary to allow the established and related connections to the internal service. |
| iptables -P FORWARD DROP | Set the policy to drop packets in the FORWARD chain. This means, unless specified (see line above) we will drop traffic. |
| iptables -A POSTROUTING -d 10.224.0.222/32 -o eth0 -p tcp -m tcp –dport 49181 -j SNAT –to-source 10.3.0.4 | Send traffic to the Internal Load Balancer on port 49181. SNAT the source IP with the private IP of the firewall (10.3.0.4). |
At this point in time, our rules are in place but they will not persist a reboot. To make sure the Firewall loads these rules on boot time we need to install the iptables-persistent package:
$ sudo apt install iptables-persistent
Once that’s installed, save your current configuration so iptables-persistent can load them during boot time:
$ sudo iptables-save > /etc/iptables/rules.v4
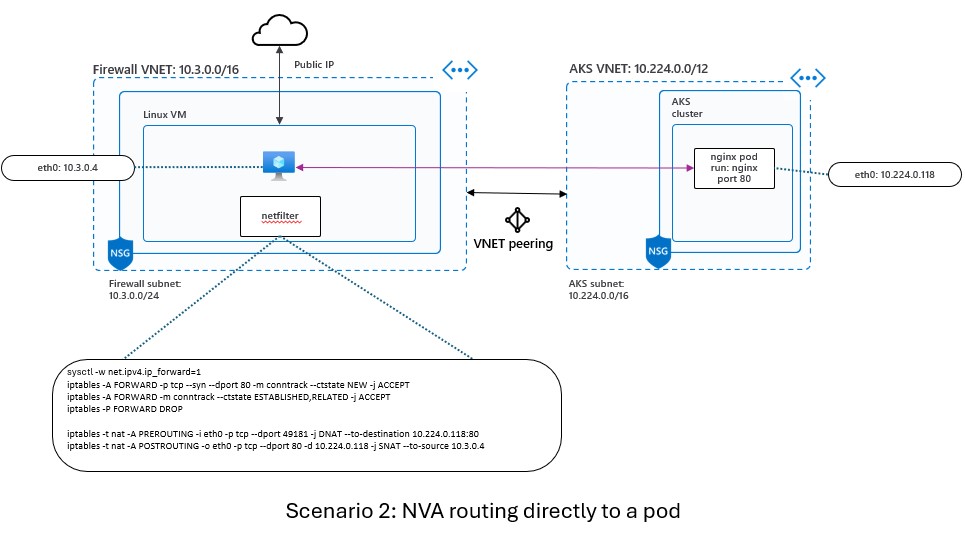
Scenario 2: NVA routing directly to a pod
In this second scenario, we will route traffic from the Linux VM directly to a pod in the AKS cluster without going through an internal load balancer. The diagram below shows the network topology for this scenario:
To implement this scenario, we will need to do the following steps:
- Create a sample workload on the AKS cluster. Follow the steps described earlier to the deploy the POD using
netshootas your base image. You do not need to deploy the Internal Load Balancer as we will not be using it for this scenario. - Set up the firewall rules on the Linux VM
The new firewall rules are:
iptables -A FORWARD -p tcp --syn --dport 80 -m conntrack --ctstate NEW -j ACCEPT
iptables -A FORWARD -m conntrack --ctstate ESTABLISHED,RELATED -j ACCEPT
iptables -P FORWARD DROP
iptables -t nat -A PREROUTING -i eth0 -p tcp --dport 49181 -j DNAT --to-destination 10.224.0.118:80
iptables -t nat -A POSTROUTING -o eth0 -p tcp --dport 80 -d 10.224.0.118 -j SNAT --to-source 10.3.0.4
Explanation:
| Rule | Notes |
|---|---|
| iptables -A PREROUTING -i eth0 -p tcp -m tcp –dport 49181 -j DNAT –to-destination 10.224.0.118:80 | Packet arrived on eth0 (coming from the public IP of the VM) and get’s DNAT’ed to the POD private IP on port 80. |
| iptables -A FORWARD -p tcp -m tcp –dport 80 -m conntrack –ctstate NEW -j ACCEPT | At this point, the original packets are now going to be send to port 80. This rule allows that flow. |
| iptables -A FORWARD -m conntrack –ctstate ESTABLISHED,RELATED -j ACCEPT | Match any packet that is related to an existing connection, using the conntrack module. This is necessary to allow the established and related connections to the internal service. |
| iptables -P FORWARD DROP | Set the policy to drop packets in the FORWARD chain. This means, unless specified (see line above) we will drop traffic. |
| iptables -A POSTROUTING -d 10.224.0.118/32 -o eth0 -p tcp -m tcp –dport 80 -j SNAT –to-source 10.3.0.4 | The last rule before the packet leaves the kernel, we run a Source NAT (SNAT) and add the Firewall private IP so the pod knows where to return this packet to. Once that packet hits the firewall, we can return it to the sender on the Internet. |
Testing and validating
To test and verify that the port forwarding rules are working - for both scenarios - you can use a tool like telnet or curl to connect to the external port 49181 from another host. You should see the response from the internal service on port 80. For example, the following command will send a HTTP request to the external port 49181 and display the response:
| Test case | Target | Note |
|---|---|---|
| From the firewall to the pod | curl http://${POD_IP_ADDRESS} |
Pod listens on port 80 |
| From the Internet to the public IP of the firewall | curl http://${PUBLIC_IP}:49181 |
This connection will be DNATed to proper endpoint (pod or ILB) |
You should see something like this:
tmp-shell:~# python3 -m http.server 80
Serving HTTP on 0.0.0.0 port 80 (http://0.0.0.0:80/) ...
10.3.0.4 - - [02/Feb/2024 20:50:32] "GET / HTTP/1.1" 200 -
10.3.0.4 - - [02/Feb/2024 20:50:33] "GET / HTTP/1.1" 200 -
10.3.0.4 - - [02/Feb/2024 20:50:34] "GET / HTTP/1.1" 200 -
10.3.0.4 - - [02/Feb/2024 20:50:35] "GET / HTTP/1.1" 200 -
Conclusion
In this article we’ve explored how create your own - basic - network virtual appliance and route traffic to an AKS cluster. from here, you can take this as a base for more complex and custom examples. Good luck !